2 Assembly
Depending on their requirements, the user has a choice of three Mini Buoy designs for measuring hydrodynamics (see Chapter 1). The following section provides instructions for the assembly of each design.
The B4 is a transparent and self-standing centrifuge tube with an MSR145W B41 acceleration logger sealed inside. The tube is anchored to the ground by fishing swivels. To build a B4, gather the following equipment (see Table 2.1):
- 50 mL clear self-standing centrifuge tube
- Label
- Floral foam
- MSR145W B4 acceleration data logger
- Silicone sealant
- Drill with a 3.5 mm brad point bit
- 3 × 5 cm (1.1 g) fishing swivels
To assemble the B4 Mini Buoy:
- Place a label inside the centrifuge tube, with the text legible through the plastic, indicating the owner, a “do not remove” notice, and contact details
- Insert a 3 cm cylinder of floral foam into the centrifuge tube. This ensures the logger is positioned at the top of the tube
- Roughly cut a 5 cm long cylinder from the floral foam that matches the diameter of the centrifuge tube
- Cut the floral foam cylinder down the middle
- Place both halves around a configured MSR145W B4 logger (see Chapter 3), then gently push the logger into the centrifuge tube with the PC connector facing upright to secure the logger in the tube
- Apply silicone sealant around the screw thread of the centrifuge tube and fasten the tube cap
- Close the lid of the centrifuge tube, and wipe away any excess silicone to give a clean finish
- Drill two holes at opposite ends through the centrifuge tube skirt 5 mm from the bottom
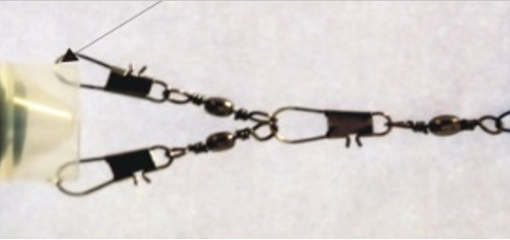
- Fix two fishing swivels through each hole, and connect both to another swivel as shown:
| Item | Cost | Note |
|---|---|---|
| MSR145B4 A logger | £250 | Unit costs decrease with bulk buy |
| 50 ml skirted centrifuge tube | £73.63 | 250 in a pack, £0.29 per unit |
| Floral foam | £17.67 | |
| Cordless drill | £107.17 | |
| 2 mm brad point drill bit | £3.09 | |
| 3 x 55 mm fishing swivel | £3.29 | |
| Sealant gun | £8.16 | |
| Silicone sealant | £7.76 | Any silicone-based sealant is suitable |
| 25 x 25 x 500 mm tee bars | £4.41 | 3.5 mm hole to be drilled at top |
| 3.4 mm cable ties | £8.26 | |
| Total cost* | £483.44 | |
| Unit cost** | £260.00 |
*Links and prices were correct as of 1st July 2024.
**Excludes equipment that only needs to be purchased once (drill, sandpaper, sealant gun etc.) and accounts for unit costs of multipack items (eye bolts, floral foam blocks, adhesive labels etc.).
The B4+ almost identical in design to the B4, with some modifications: the centrifuge tube is UV-resistant without a skirt, an eye bolt and fishing line rings are fitted to provide more durability, and steel shot is added to the tube to increase sensitivity to current and wave action. To build a B4+, gather the following equipment (see Table 2.2):
- 50 mL UV-blocking centrifuge tube
- Sand paper
- Drill with a 3.5 mm brad point bit
- M4 Eye bolt and nut
- flathead screwdriver
- Epoxy glue
- 20 g steel shot weight
- Floral foam
- Waterproof label
- 250 lb / 113 kg nylon coated 1×7 steel strand fishing line
- Single barrel copper/nickel crimp sleeves (the sleeves should be rated to correctly fit the fishing line)
- Crimp tool with cutter (the tool should be rated to correctly crimp the sleeves)
- MSR145W B4 acceleration data logger
- Silicone sealant
To assemble the B4+ Mini Buoy:
- Abrade the bottom of the centrifuge tube (this removes any lubricant on the tube and creates a better surface for the epoxy glue to bond with)
- Drill a 3.5 mm hole in the bottom of the centrifuge tube using the brad point bit on a high-speed setting
- Remove any plastic debris that may be blocking the hole on the inside of the centrifuge tube using the flathead screwdriver
- Select an eye bolt and nut. Check whether the eye bolt easily threads onto the bolt. If not, discard the bolt
- Drop the nut into the centrifuge tube and gently shake the tube until the nut is oriented above the hole
- Using the flathead screwdriver to hold the bolt in place, thread the eye bolt through the hole and screw it into the nut until finger tight (overtightening may damage the centrifuge tube)
As the nut threads around the bolt, it should eventually become lodged between the sides of the centrifuge tube allowing for a finger tight fit. If the eye bolt continues to twist, unthread the eye bolt, discard it, and try again with a different eye bolt (sometimes the threading is too short and the nut cannot hold fast between the thread and centrifuge tube).
- Mix the epoxy glue according to manufacturer instructions
- Dab some expoxy glue around the eye bolt, ensuring there’s enough glue to cover any gaps that might allow water into the tube
- Allow the epoxy glue to cure according to manufacturer specifications
- Pour 20 g of steel shot into the tube.
Adding shot reduces the buoyancy of the Mini Buoy, making it less stable in the water column. This has been shown to improve the accelerometer sensitivity to detecting currents and waves.
- Cut a 3 cm long cylinder from the floral foam that will fit comfortably into the tube
- Insert the floral foam cylinder into the tube. This holds the steel shot in place and ensures the logger is positioned at the top of the tube
- Attach a waterproof label onto the centrifuge tube indicating the owner, a “do not remove” notice, and contact details
- Thread the fishing line through a crimp sleeve and loop the fishing line back on itself to form a ring of ~2 cm diameter
- Crimp the sleeve so it fits tightly around the fishing line
- Thread another fishing line through a new crimp sleeve, then through the eye bolt and first fishing line ring
- Adjust the diameter of the ring so the total chain length is 4 cm, then crimp
- Roughly cut a 5 cm long cylinder from the floral foam that matches the diameter of the centrifuge tube
- Cut the floral foam cylinder down the middle
- Place both halves around a configured MSR145W B4 logger (see Chapter 3), then gently push the logger into the centrifuge tube with the PC connector facing upright to secure the logger in the tube
- Apply silicone sealant around the screw thread of the centrifuge tube and fasten the tube cap
- Close the lid of the centrifuge tube, and wipe away any excess silicone to give a clean finish
| Item | Cost | Note |
|---|---|---|
| MSR145B4 A logger | £250 | Unit costs decrease with bulk buy |
| 50 ml UV centrifuge tubes | £52.92 | 50 in a pack, £1.06 per unit |
| Cordless drill | £107.17 | |
| 4 mm brad point drill bit | £2.29 | 3.5 mm allows for a tighter fit |
| 4 mm flathead screwdriver | £5.21 | |
| M4 Eye bolt | £50.45 | 200 in a pack, £0.25 per unit |
| M4 Nut | £27.20 | 200 in a pack, £0.14 per unit |
| 180-220 (fine) grit sandpaper | £28.00 | |
| Epoxy glue | £8.54 | |
| 2.25 mm steel shot weight | £19.50 | |
| Floral foam | £17.67 | |
| Crimping pliers | £9.99 | Must be compatible with crimp sleeves |
| 210 lb fishing line | £10.99 | Line should be >200 lb |
| 1.6 mm crimp sleeves | £2.49 | Must be compatible with pliers and line |
| Sealant gun | £8.16 | |
| Silicone sealant | £7.76 | Any silicone-based sealant is suitable |
| 25 x 25 x 500 mm tee bars | £4.41 | 3.5 mm hole to be drilled at top |
| 3.4 mm cable ties | £8.26 | |
| Industrial adhesive labels | £22.34 | |
| Total cost* | £643.35 | |
| Unit cost** | £270.00 |
*Links and prices were correct as of 1st July 2024.
**Excludes equipment that only needs to be purchased once (drill, sealant gun) and accounts for unit costs of multipack items (floral foam blocks, cable ties, adhesive labels etc.).
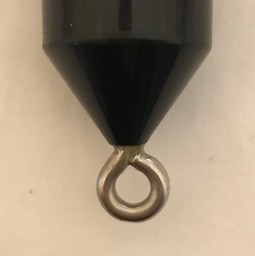
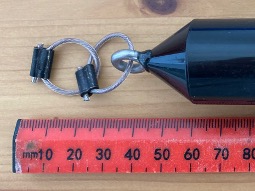
The Pendant2 can be directly tethered to a pole in the ground using fishing swivels as the logger itself is buoyant and waterproof. To build a Pendant, gather the following equipment (see Table 2.3):
- HOBO Pendant G acceleration data logger
- HOBO Optic USB Base Station necessary for connecting the logger to the PC
- 5 cm (1.1 g) fishing swivel
To assemble the Pendant Mini Buoy, simply attach the fishing swivel to the anchor point on the Pendant logger as shown:
| Item | Cost | Note |
|---|---|---|
| HOBO Pendant G Logger | £147.49 | |
| HOBO Optical Base Station | £217.36 | |
| 25 x 25 x 500 mm tee bars | £4.41 | 3.5 mm hole to be drilled at top |
| 3 x 55 mm fishing swivel | £3.29 | |
| 3.4 mm cable ties | £8.26 | |
| Total cost* | £380.81 | |
| Unit cost** | £155.00 |
*Links and prices were correct as of 1st July 2024.
**Excludes equipment that only needs to be purchased once (optical base station) and accounts for unit costs of multipack items (cable ties).
The MSR145W B4 is a standalone accelerometer with integrated rechargeable lithium ion battery and memory in a waterproof seal. Acceleration is measured along the y-axis.↩︎
The Pendant G Data Logger is a standalone accelerometer with a coin cell battery and memory in a waterproof seal. Acceleration is measured along the x-axis.↩︎